CHECKING IN A DOCUMENT (DMS USER)
Prerequisite(s): The System Administrator must have assigned you a DMS Customer role.
A document must have been uploaded to a customer folder and unlocked (checked-out) in the DMS folder structure.
You must have read/write privileges to this customer folder and to its documents.
Note: See section CHECKING OUT A DOCUMENT FOR EDITING (DMS USER) prior to completing the following steps.
1. Hover your mouse over the Administration link on the menu bar.
2. Click the Document Management sub-link from the menu bar.
3. Navigate the DMS folder structure to the folder where you wish to check-in an edited document by clicking each folder name link.
4.
Click the update  icon to create a new revision of
the document in CapEx Manager.
icon to create a new revision of
the document in CapEx Manager.
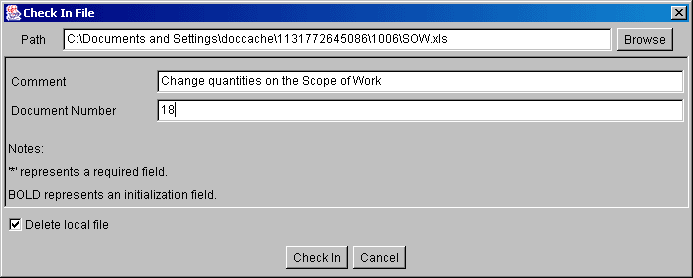
5. In the ‘Check In File’ popup menu, review the Path displayed.
Note: If you did not save the edited document to a new location on your computer, the path displayed will be the default path to the temporary file. In this case, do not change the path location. If you saved the edited document to a new location on your computer, click the Browse button to select the document in its saved location.
6. Click the Check-In button to check the edited document back in to CapEx Manager (see Screen Shot).
Note: Optional comments may be added to the document in the Comment field.
In order to prevent temporary copies of the edited document from being saved on your computer, the checkbox for the ‘Delete Local File’ field has been checked. If you wish to keep a local copy of the edited document on your computer, uncheck this checkbox.
Click the Cancel button to cancel the check-in of this document.